molecular cuisine

Kuzu Blueberry Tofu

Kuzu Blueberry Tofu dessert recipe

It will take you literally 15 min to make this incredible Kuzu Blueberry “Tofu” dessert. It’s very easy to make and it’s one of the most delicious, light desserts out there. And, let’s just say it right here, it’s not an actual Tofu. There’s not soy in this recipe, but the texture on the end product is very similar to silken tofu. This recipe was inspired by 2 very popular Japanese desserts, called  and Kuzukiri. In Kuzumochi only water and sugar are usually used. Instead here, I’ve decided to use a more fresh and bright ingredient – fresh blueberries. You can of course, explore your flavours and substitute it to other juices & blends. Kuzu, a.k.a. Kudzu starch is an amazing ingredient. It’s one of the most distinctive types of starches. You can learn more about it HERE. I’ve also made a video on Kuzu starch (below), showcasing this Kuzu dessert recipe. [siteorigin_widget class=”WP_Widget_Media_Video”][/siteorigin_widget] You can purchase Kuzu (Kudzu) starch HERE: https://amzn.to/2GldKEi If you want to learn other cool culinary techniques, click HERE. You can also see more of my video recipes HERE.

Kuzu Blueberry Tofu dessert recipe Read More »

Kuzu gnocchi

Kuzu Gnocchi recipe (Modernist gluten-free twist on tradition)

As I was going deep into learning about various culinary starches, I came across this incredible Kuzu Gnocchi recipes. Which, I of course, modified and now I present it to you. Kuzu, a.k.a. Kudzu starch is one of the most distinctive culinary starches, in terms it its properties and capabilities in cooking. Kuzu is a root derived natural starch with neutral flavour and clear appearance. Out of all the natural culinary starched, Kuzu is the only one that had a gelatineous texture, which could be used in so many ways in cooking, especially plant-based cooking. It is also, one of the few that are not sensitive to high heats and prolonged heat exposure. [siteorigin_widget class=”WP_Widget_Media_Video”][/siteorigin_widget] Directions: Make tomato water. Just blend a few tomatoes with a little bit of water and then stain off the pulp. You can also use pulpless tomato juice. Put the tomato water back into the blender and blend in Kuzu starch until completely smooth and not Kuzu lumps are visible. Pour the Kuzu tomato mix into a small pan, bring to boil, reduce to simmer and cook for about 10 minutes on low heat, while continuously whisking. After 10 minutes, add in the cheese, rasped on a microplane. Whisk it on low heat. Transfer the Kuzu Gnocchi batter into a firm/strong piping bag. Pipe small pieces of batter right into ice cold water bath, separate individual gnocchis with scissor cuts. To warm up Gnocchi before serving, drop them in a warm broth and let them come to temperature. To serve, mix in a little be of cold-pressed canola oil, top with micro greens and toasted sesame seeds. Enjoy! You can purchase Kuzu (Kudzu) starch HERE: https://amzn.to/2GldKEi If you want to learn other cool culinary techniques, click HERE. You can also see more of my video recipes HERE.

Kuzu Gnocchi recipe (Modernist gluten-free twist on tradition) Read More »

Edible Helium Ballons

What I’ve learned, trying to make Edible Helium Balloons by Alinea restaurant

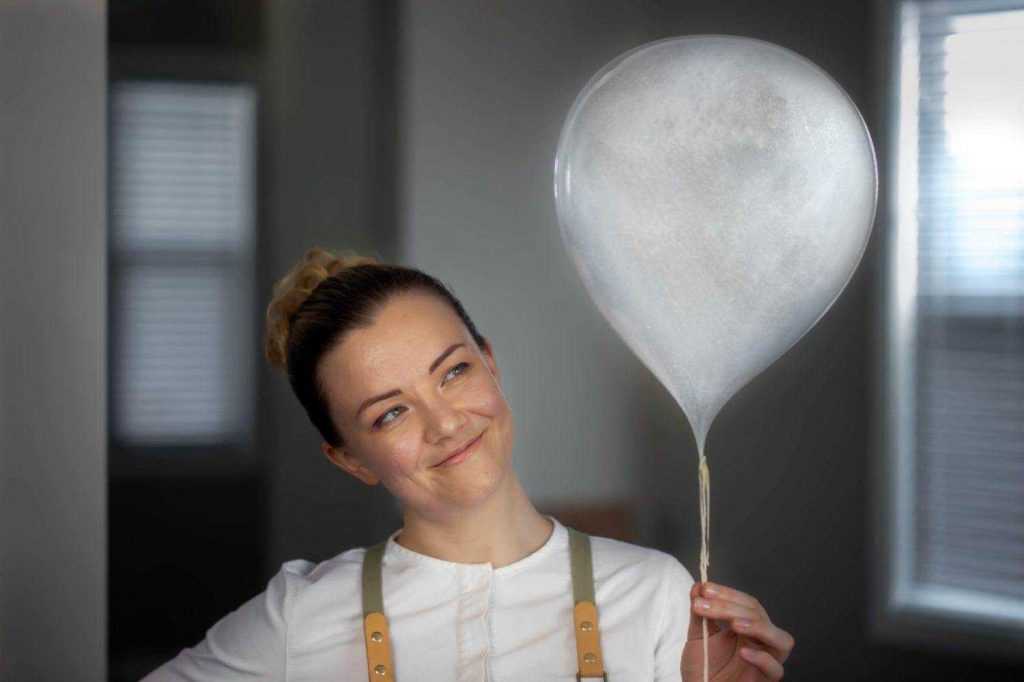
Edible Helium Balloons is a signature dish of a 3 Michelin Star restaurant in Chicago, called Alinea (also known from the “Chef’s Table” show on Netflix). “Wouldn’t it be SO COOL to learn how to make those edible balloons?!” – I thought to myself… [siteorigin_widget class=”WP_Widget_Media_Video”][/siteorigin_widget] Chef Grant Achatz and Chef Mike Bagale from Alinea spent probably years in R&D for those edible helium balloons, and I naively thought that I can learn to make them in one go… Boy, I was wrong… First of all, the recipe was not that easy to find. The one that I’ve managed to find on web, was simply not working. So, I had to tweak the recipe several times, test out different variations, run out of ingredients a few times, and finally, after a few weeks, I’ve made it! The balloon was inflating! And just when I thought the hardest part was oven, the second problem revealed itself. Balloons where getting tiny little holes and could not float properly. A few trials and failure and that problem was also fixed. [siteorigin_widget class=”WP_Widget_Media_Image”][/siteorigin_widget] Then, came the third problem, that I honestly though I won’t be able to eliminate. I almost gave up… No matter how many times I’ve tried, I could not figure out how to put a twine on the balloon without destroying it…  But then, by accident (like all the genius solutions come across), that was mastered as well. Preparation time: Days/Weeks/Months/Years…. (just kidding), 5 min to read this article and 6 min to watch my video and you are all set! Cooking time: 20 min Per servings: many… I did’t really count, but you can definitely make at least 50 edible balloons (or more) with these ingredients Ingredients: 15 g (1 sachet bag) of Powdered Gelatin 2 tbsp Water 1 cup White Sugar 2 tbsp Corn Starch ½ tsp Xantham Gum 2/3 cup Corn Syrup ½ cup Carrot Juice (or water) ½ tsp Salt Equipment & tools: Helium tank Plastic tube Whisk Medium-size sauce pot [siteorigin_widget class=”WP_Widget_Media_Image”][/siteorigin_widget] IMPORTANT TIPs (what I’ve learned): You cannot make this floating desert on your own! You need 1 person to help you out. Especially with the twine part. When you attempt any molecular gastronomy recipes, make sure your thermometer is properly working. It’s like with baking, temperatures and exact measurements are super important! In this case, it is important to bring the mixture up to 255F in internal temperature. My thermometer was not working properly as it turned out, so I had to buy a new one. You can start inflating edible balloons once the internal temperature drop down to 170 F. Use a wider plastic tube. Inflation does not work as well with tubes of a small diameter. Make sure that no mixture is hanging off the tube when you start inflating your balloons. Whatever is handing off will create a hole later, so get rid of it. The more mixture you wrap around the tip of your tube, the bigger the balloon you would be able to inflate. But do not inflate too big of a balloon, it will fly away before you know it. Wait a few seconds before trying to put a twine around your edible helium balloon. Helium inside the balloon will push a balloon upwards and stretch the bottom part, so it actually would become possible for you to put a twine on without touching and destroying your balloon. Serve your edible helium balloons immediately, or max within 1 min. They will not deflate, but as I’ve mentioned above, they tend to fly away, because of the helium pushing them upward and stretching the bottom part. The longer you wait, the more it’s getting stretched and eventually it will bread apart from the twine and will fly away. For REVERSE SPHERIFICATION process, click HERE You can also see more of my video recipes HERE

What I’ve learned, trying to make Edible Helium Balloons by Alinea restaurant Read More »

Reverse spherification

Reverse spherification process – breaking down 2 methods | Molecular gastronomy

Reverse Spherification Learning the reverse spherification process is the fundamental step in advancing your culinary skills towards the molecular gastronomy. In reality making liquid spheres is quite easy, as long as you follow precise measurements. In this video (below), I show 3 examples of the reverse spherification. I make spheres with 2 relatively thick substances and 1 thinner substance. How To: Ingredients for the liquid spheres: 6 g Calcium Lactate (3% of the “spherified” liquid volume) 200 g Any Liquid that you wish to enclose into spheres (e.g. Kefir / Tomato juice / Wine) … FULL RECIPE INCLUDED WITH CULINARY ACADEMY Important TIPS to remember: Make sure that you do not mix up Calcium Lactate with Sodium Alginate. Use Sodium Alginate for Water and Calcium Lactate for the “spherified” liquid, and not the other way around. *that happened to me before… not the best idea… …. get access to REcipe

Reverse spherification process – breaking down 2 methods | Molecular gastronomy Read More »

Vegan caviar

Learn to cook vegan caviar with Agar Agar

Vegan Caviar Vegan caviar can be made using a simple technique from the molecular cuisine. In this recipe I’ve made caviar-like spheres from tomato juice and soy sauce with help of Agar Agar and cold oil. But you can use any liquid here to cook vegan caviar (except for oil, obviously). Anyone can do this recipe, I promise! Vegan caviar ingredients: Soy sauce – 100 ml …. FULL RECIPE INCLUDED WITH CULINARY ACADEMY Full Recipe is Part of the CULINARY ACADEMY Join TODAY and have access to all Classes + Recipes. Once enrolled, you’ll get a LIFETIME ACCESS to the academy, incl. all the new upcoming cooking lectures and modules and this recipe. ENROLL

Learn to cook vegan caviar with Agar Agar Read More »